Earlier this year , I ended up doing a presentation for the University of Guelph’s CIS*4820 (Game Programming) course. During the talk, I shared a number of tips and tricks on how to make games stand out by adding “Juice” to them. Inspired by a great talk from 2013 about this (Juice it or lose it) where two game developers showed how a simple game of Breakout could get a lot of eye-candy effects that would make the gameplay seem a lot more exciting, I wanted to give the students a chance to see how some of these things would be achieved in practice. My hope was that by sharing with them that I am an alumni it would drive their interest even further, as there are some topics which I learned back at The University of Guelph that are still relevant to my everyday work (i.e. finite state machines).
For the talk, I created a number of examples which would individually showcase how to add “Juice” to your game. These included some simple types of scaling, jelly effects, how to slow down things using time dilation and how to do a ghosting effect for a character.
The Ghosting effect is visually appealing and naturally got the most interest during the talk, which is why I’d like to break it down further here.
While investigating how to do the effect, I ran into a number of implementations and realized that the most common pattern for it would be to spawn GameObject copies with a certain frame offset. However, one of the things that I have become wary of during the time I’ve worked at Unity is that spawning GameObjects in the middle of your game is not the best thing to do. There are various reasons, and some work arounds, but my biggest concern is the unnecessary allocations that spawning a GameObject implies. Other considerations being:
- Allocating one Sprite Renderer per instanced GameObject
- GameObject lifecycle callbacks during instantiation (i.e. Awake() and friends)
- Transform registration
Naturally, we can get around the allocation penalty by using a Memory Pool, but again, that’s working around the issue and not addressing the fundamental problem which is, why would a full GameObject need to be instantiated for a temporary and non-interactive copy of the character?
Particles to the rescue
After thinking sometime about rolling out my own solution for this, and implementing some half-baked sprite sheet with quad creation, I realized that the obvious and battle-tested solution to this would be to just use Unity’s particle system. Also, this technique would be easy to share with the students as they would not need to dig through code I wrote and instead they’d be able to use an already well established particle editing workflow.
To achieve this, I took the base sprite, added it to a particle system and tweaked various settings across its modules to spawn frame specific versions of the character and let the particles fade out over time.
This is what the end result looked like:
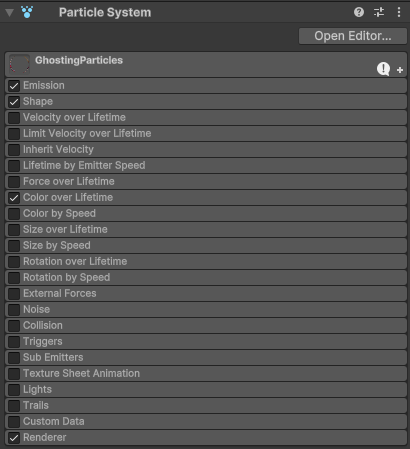
The following modules are enabled in the particle system:
- Emission
- Shape
- Color over Lifetime
- Renderer
As can be seen below:
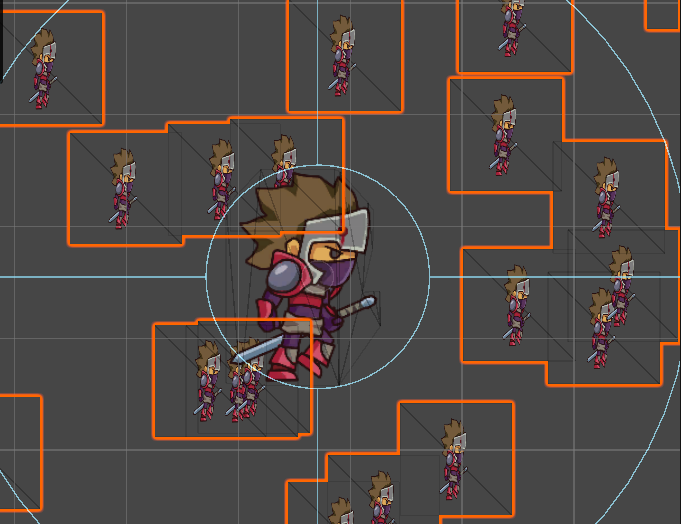
First, its important to get the scale correct. By default, a particle system will emit particles out in a radial fashion, so if you have a material with your texture, you’ll end up with this as a starting point:
To get this under control, you’ll need to change the following properties:
- Start Size: 2.5
- Start Speed: 0
- Start Lifetime: 0.25
- Emission
- Rate over time: 0 -> This will shut off the particle emission completely, allow us to control it via script
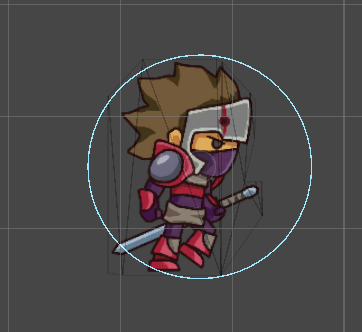
At this point, all you should see is the Particle System’s radius and your character:
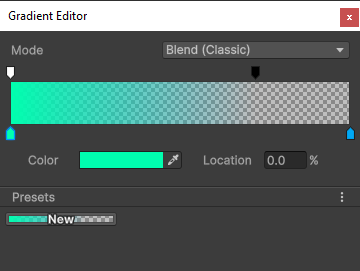
The next change is in the Color over lifetime.
The trick here is to use both the automated color change to you advantage and have a start and end color, together with a start/end alpha, so the Color slider looks something like this:
The top represents the alpha value (which starts at 100% with the white color, and ends at 0% with the black color) and the bottom represents the start and end colors (i.e. greenish to blue). The blend works quite well, and the Particle System will handle this over the specified Start Lifetime of your particle which was one of the first things we changed. Having set the Start Lifetime to 0.25s means the system will interpolate their color values over that amount of time.
Emitting Particles via script
The script here is kept simple on purpose, to show the bare minimum that would be needed for making the effect start. This is where we begin spawning of the particles:
else if(m_State == PlayerState.StateDash)

{

    // Do effect

    float directionMultiplier = (m_Direction == Direction.Right) ? 1.0f : -1.0f;

    Vector2 pos = transform.position;

    pos.x += (m_DashSpeed * directionMultiplier) * Time.deltaTime;

    transform.position = pos;


    if (Time.realtimeSinceStartup - m_LastEmit > m_EmitDelay)

    {

        EmitParams emitParams = new EmitParams();

        emitParams.position = transform.position;

        m_GhostParticleSystem.Emit(emitParams, 1);

        m_LastEmit = Time.realtimeSinceStartup;

    }


    if (Time.realtimeSinceStartup - m_StartDash > m_DashDuration)

    {

        m_State = PlayerState.StateRunning;

    }

}
There are a couple things that need to happen:
- The player must be in a “Dash” state (explained next)
- We keep track of when the last particle was emitted, and if enough time has passed we emit one more (and reset the duration).
- Once we have dashed “long enough” we go back to the running state for the player, so another dash can be potentially triggered.
That’s almost all of it, just one last piece needed to make sure the particles are emitted in the correct direction, and the last bit of setup code for time tracking goes here:
if(Input.GetKeyDown(KeyCode.Space))

{

   m_State = PlayerState.StateDash;

   m_StartDash = Time.realtimeSinceStartup;


   var particleRenderer = m_GhostParticleSystem.GetComponent<ParticleSystemRenderer>();


   particleRenderer.material.mainTexture = m_SpriteRenderer.sprite.texture;


   EmitParams emitParams = new EmitParams();

   emitParams.position = transform.position;


   float direction = (m_Direction == Direction.Right) ? 0 : 1.0f;

   particleRenderer.flip = new Vector3 (direction, 0, 0);

   m_GhostParticleSystem.Emit(emitParams, 1);

   m_LastEmit = Time.realtimeSinceStartup;

}
In this code block, once we press the Space Bar, we’ll signal to our MonoBehaviour that we need to start the dash effect. To do this, we:
- Change the player’s state to “Dash”
- Figure out which direction the player is facing, and flip the particle renderer accordingly
- We emit a single particle, and record the time for when our Dash state begins
- The particle we emit is a snapshot of where in the sprite sheet the player’s animation is, so we repeat that image as many times as our settings allow.
Finally we can bring it all together, and we have a simple ghosting effect with much less overhead than spawning a large amount of GameObjects and reducing memory overhead while doing it too.
Overall, I was quite happy that I was able to present to a group of students, and that we spent a good amount of time in the Q&A part of the talk discussing various aspects of Game Development, but also about the games industry in general.
Last but not least, I’d like to thank Dennis Nikitenko for letting me present in his class, and Chandler Gray for bringing the two of us together so we could make this happen!
Until next time 😀

